Huawei Sun - Setup & prerequisites
A Huawei SUN inverter is required, which communicates via the WiFi dongle. Systems with a Huawei Emma are currently not supported.
MODBUS-TCP must be activated on the dongle to connect to the inverter. The setting is only possible with installer rights via the setup assistant or remotely via the Fusion Solar web portal.
The dongle only allows simultaneous use by one device. Interference is possible with several devices or programs. With the appropriate knowledge, a Modbus proxy can be installed, which allows many devices to be used simultaneously.
If a Huawei wallbox is available, the “Keep connection” option should be deactivated. The timer should not be set too small.
IP address
IP address of the dongle. The IP address can be determined via your router or via the FusionSolar app.
Port
The communication port set in the dongle. If this has not been changed, the correct setting is 502
Device ID
Device ID of the inverter. For a device, this is usually 1. The device ID can be determined via the FusionSolar app or via the FusionSolar portal.
Timer
The value determines the pauses between requests to the inverter in seconds. The value should not be set too low, as the dongle is not particularly powerful. In particular, if other programs or devices use Modbus, select a larger value to avoid faults.
Peak DC
Maximum power in kWp. The value is used for some displays.
Battery size
Battery size in kWh. The value is used for some displays.
Keep connection
If no other devices are using Modbus, ‘Keep connection’ can be activated. PVvis then blocks Modbus, shorter polling intervals are possible.
Inverter is slave of a cascade
PVvis only accepts the performance data of the inverter and ignores battery data and data from the smart meter. In addition, no control is possible for this device.
Ignore battery data, ignore smart meter
In some constellations, it makes sense to ignore battery data or data from the smart meter.
Hide option buttons
PVvis offers the option of controlling AC charging and the (discharging) charging power. The corresponding buttons in the menu can be hidden here.
Huawei - Charge/discharge battery option

Huawei Luna settings
The PVVis app’s charge/discharge option enables forced charging and discharging of the battery. This can be useful for variable electricity tariffs, for example, or in the event of forced curtailment by the grid operator.
The function can also be controlled automatically via automation.
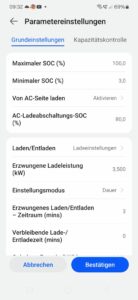
To ensure that charging/discharging works correctly, settings must be made once in the Huawei app. Select the battery under Devices and then ‘Parameter settings’ in the top right-hand corner of the window.
Activate ‘Charge from AC side’.
The SOC selected below is taken into account during forced charging. Charging is not carried out if the storage tank is full.
You must now set the power to be used for charging and discharging. Select ‘Charge’, ‘Duration setting mode’ and a short time period, e.g. 2 minutes. The charging power can also be selected. This is also used by PVVis. The process must now be started once so that the information is saved.
The discharge power is set in the same way. Here too, the process must be started once.
‚Charge from AC‘ can and should then be deactivated again.
Hoymiles, AHOY-DTU - Setup & prerequisites
An Ahoy-DTU is required that sends performance data to a fully configured MQTT server or provides an API. Current firmware must be installed on the Ahoy-DTU. The devices can be purchased ready-made on the larger known platforms. Hoymiles devices with built-in WLAN do not work.
When connecting via the API, the IP address of the Ahoy-DTU and the ID are required. If only one balcony power station is configured, this has the ID 0.
When connecting via an MQTT server, the IP and port of the server are required. The value for Topic can be found in the Ahoy-DTU settings under MQTT/Topic. A ‘/’ must be appended followed by the name of the inverter assigned in the Ahoy-DTU. If the topic is ‘inverter’ and the name is ‘BKW1’, then ‘inverter/BKW1’ must be entered. Capitalization must be observed.
APsystems EZ1 - Setup & prerequisites
For the local connection to an APsystems EZ1 inverter, ‘Local mode’ must be activated for the device. This can be done via the APsystems app. The device does not send any data to the cloud in local mode.
Tasmota Smartmeter Reader
A Tasmota Smartmeter Reader is an inexpensive way to determine feed-in, electricity consumption and household consumption directly via the supplier’s electricity meter.
In conjunction with the PVvis app or the PVvis displays, the devices can be used, for example, to automatically switch consumers as soon as there is a surplus.
Tasmota smart meter readers can be purchased on the larger platforms, e.g. as “bitShake SmartMeterReader”, ‘Hichi’ or “Wattwächter”.
For correct functioning with PVvis, the data points in the configuration script must be labeled as follows:
Power consumption/feed-in: e_in/e_out , 1_8_0/2_8_0 or total_kwh/export_total_kwh
Power: power
As device designation: „EMH“ or „Energy“
If necessary, the designations in the Tasmota script must be adapted accordingly.